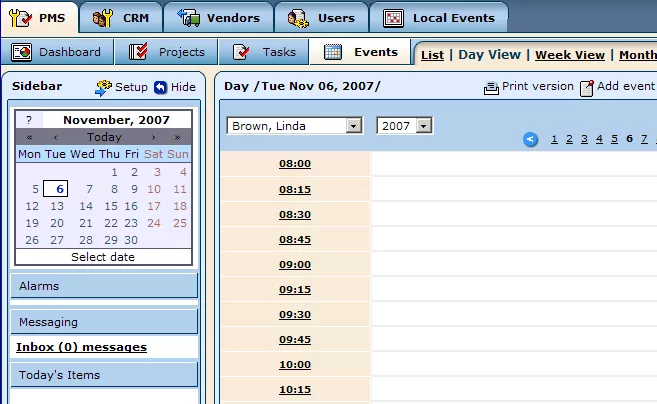
To access the "PMS" tab's "Calendar" feature, either hold your cursor over the "PMS" tab and click on the "Calendar" option from the menu which appears, or click on the "Events" tab within the "PMS" section. Either way, you will be presented with a list of times (each time having an empty line to the right of it, unless some event has already been entered).

From the calendar located in the upper left-hand corner of the screen, select the specific date for which you would like to view, modify, or create events. You will then be able to locate and click on the time for the desired event within the time-table.
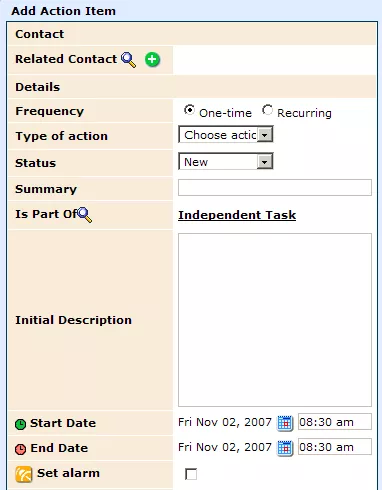
Once you have selected the time, you will be presented with a form labeled "Add Action Item."

Simply fill out the relevant fields with information about the event that you would like to add to the calendar.
Related Contact:
In order to connect the event to a particular company or department, simply click on the following icon:
 . (If the contact does not yet exist within the
CRM system, you will have to click on the green "+" icon and create a new profile).
In the search window that appears, you can fill out the provided fields (displayed below) in order to locate the desired contact.

Frequency:
In this field you can specify whether the event will be a one-time thing or a recurring affair. If you select "Recurring," a new field will appear, labeled "Define," in which you can specify whether the event occurs daily, weekly, or monthly.
Type of Action:
Here, you can specify the type of the event you are creating, by selecting the desired option (Note, Meeting, Phone Call, or Vacation) from the drop-down menu.
Status:
Using the drop-down menu in this field, you can specify whether the event is "New," "Done," or "Canceled."
Summary:
Within this field, you can write a brief description of the event. Try to keep your summary as short as possible though, as the space is limited, and you will have an opportunity to to write a more detailed account within the "Initial Description" field anyway.
Is Part Of:
By default, this field will be set to "Independent Task." However, by clicking on the magnifying glass icon, you can connect the event to a particular project or task within the system that it is related to. Simply type the desired project/task's name (a part of it may even be enough) into the empty field in the "Select Project/Task" window that appears, and then select it from the list of results.
Initial Description:
This field allows you to write a more detailed, complete description of the event, in order to expand upon and clarify the brief summary already created.
Start Date and End Date:
These 2 fields allow you specify the start and end dates of the event (particularly useful if the event has been specified as "Recurring"), by clicking on the calender icons and selecting the desired dates from the calendar window that appears.
Assigned To:
This field allows you to assign the event to an employee within the system. Simply select the desired employee's name from the drop-down list provided and the event will be assigned to them.
Calendar:
This last field allows you to specify whose calendars you would like the event to show up in. Simply select the desired employees from the provided list (using the "Ctrl" key for multiple selection) and the event will appear in their calendars.
Once you have completed the relevant fields, click on "Save" and the event will be created.


 . (If the contact does not yet exist within the
