In order to add a new "ToDo" item, click on the
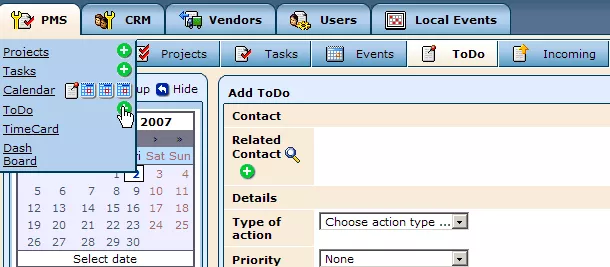
 "Add" icon, which can be found either in the top right-hand corner of the "ToDo List" within the "ToDo" section or by holding your cursor over the PMS tab (as pictured below).

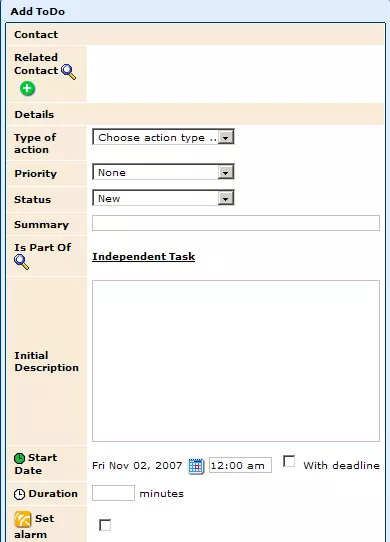
Once clicked on, you will be presented with a window labeled "Add ToDo."

Simply fill out the relevant fields within the form in order to create the "ToDo" item.
Related Contact:
In order to connect "ToDo" items to a particular contact or client, click on the
 magnifying glass icon to find the desired individual or company. In the window that appears, you can use the provided fields to specify information about the contact in order to locate their entry within the system. Once you have filled out the relevant fields, click "Search" and select the desired contact from the list of results.
If the contact has not yet been entered into
the CRM system, you will have to create a new profile by clicking on the
 "Add" icon. Further information on this process can be found in our
CRM section.

Type Of Action:
In this field, you can specify what type of action the "ToDo" item involves (email, report, errand, etc.) by selecting the appropriate option from the drop-down menu. If none of the provided types are appropriate, however, feel free to leave this field blank.
Priority:
In this field, you can specify the importance and urgency of the "ToDo" item in order to indicate when it should be completed. In order to do so, simply select an appropriate number from the drop-down menu (10 being the highest priority).
Status:
This field allows you to specify the status of the item (new, redo, done, etc.), in order to further clarify exactly what needs to be done.
Summary:
In this field, you can enter a brief description of what needs to be done, which will act as the title for the item's entry, giving users an idea of what the "ToDo" item entails.
Is Part Of:
This field allows you to connect the "ToDo" item to some larger task or project within the system. In order to do so, simply click on the magnifying glass icon next to it, and fill out the provided search fields. Then, from the list of results, select the name of the desired task or project.
By default, this field will be set to "Independent Task." Should you not wish to connect the "ToDo" item to some other task or project, simply leave the field with this setting (there is no need to use the magnifying glass icon).
Initial Description:
This field gives you the opportunity to compose a more detailed, full description of what needs to be done.
Start Date and Deadline:
These fields allow you to specify a start date and end date for the "ToDo" item by clicking on the calendar icon and selecting the desired date. Should you wish, you can also type in a specific time for each of the fields.
Note: If you would like to set a deadline, you will first have to check the box within the "Start Date" field labeled "With Deadline."
Duration:
In this field, you can specify, in minutes, how long the "ToDo" item should take.
Set Alarm:
By checking this box, a new field will appear, where you can select a date from the calendar and type in a specific time. The employee to whom this item is assigned will then receive a notification/reminder about the item at the specified date and time.
Assigned To:
With this field, you can select an employee from the drop-down menu who you would like to complete the "ToDo" item.
Once you have filled out the desired fields, click "Save," and your "ToDo" item will be created.
 "Add" icon, which can be found either in the top right-hand corner of the "ToDo List" within the "ToDo" section or by holding your cursor over the PMS tab (as pictured below).


 magnifying glass icon to find the desired individual or company. In the window that appears, you can use the provided fields to specify information about the contact in order to locate their entry within the system. Once you have filled out the relevant fields, click "Search" and select the desired contact from the list of results.