Call 1-888-670-1652
Spire CoreDB Connect Error (2002) Connection timed out
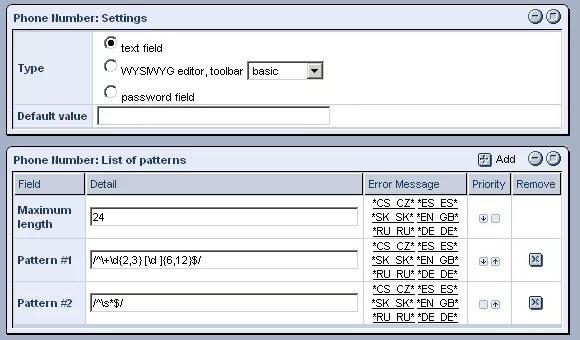
TextIf you select to create a "text" data type, after entering the data type's name and clicking "Save," you will be presented with a number of options. First, you will be able to specify the exact type of field you would like to create. You can either select to create a basic text field, a larger field in which text can be entered into the WYSIWYG editor, or an encrypted field to be used for entering passwords. You can also enter a "default value," such as "Enter text here," to be displayed in the field until users replace it with their own text. Finally, you can specify a maximum length (expressed in number of characters) for text entered into the field, as well as accepted patterns of data and error messages for each of the languages that your site supports, which will appear if users violate the specified criteria when filling in the field. Below, you will find some common fields created with the "text" data type, along with instructions on how to go about replicating them. Short Text:"Short Text" fields can be used in forms for users to enter their names, street addresses, and other brief details, specifically those consisting of static text. In order to create such fields, select the "Text Field" option in the "Settings" window. You should then enter a relatively short number of characters for the field's maximum length (250, as pictured in the image below, is generally a good length). After specifying the desired error messages, simply click "Done" at the bottom of the screen, and "Short Text" will be added to the "List of Available Datatypes." One special variant of the "short text" data type is the E-mail, for which more information can be found in the separate section on E-mail data types. Long Text:"Long Text" fields can serve to show or change multi-line text. In creating such fields, you can either choose to use the basic "text field" or the "WYSIWYG editor" window. There is also generally a maximum length of 65500 characters (the default maximum length that appears when creating "text" data types). After creating the desired error messages, click "Done" at the bottom of the screen, and "Long Text" will be added to the "List of Available Datatypes." Phone Number:In order to create a field in which phone numbers will be entered, you should select "text field" from the "Settings" window. You should then specify the maximum number of characters that you would like users to be able to enter into the field (24 in the picture below). After you have specified the maximum length, you should specify the particular patterns of data that you would like to be accepted. In order to do so, click on the
A new row will appear in the "List of Patterns" table, in which you can enter the pattern (specified using PHP regular expressions) that you would like to be used in entering phone numbers. Then, when users enter a particular string of data into the field, if it does not match the specified pattern, an error message will be displayed (which you can create for all of the languages that your site supports, by clicking on each language in the pattern's row and entering the desired text). Should you wish for additional patterns to be accepted, simply click on the
Once you are done specifying the accepted patterns and their associated error messages, click "Done" at the bottom of the screen, and "Phone Number" will be added to the "List of Available Datatypes." Patterns & Error Messages:Patterns can be used to regulate the form in which data can be entered into a particular field. In order to create a new pattern, simply click on the
In the window that appears, you can enter the desired pattern using PHP regular expressions. Once you have created the pattern, you should create an error message to go along with it. In order to create error messages, simply click on the desired language within the pattern's row of the table, and enter the text that you would like to be displayed when users, whose preferred language is the one in question, enter a string of data into the field that does not match the pattern specified. In order for a string of data to be accepted and successfully entered into a field, it will have to meet at least one of the patterns specified. If you would like to change the order in which the patterns are compared to the strings of data, simply use the arrows in the "Priority" column to move the desired patterns up and down within the list. The system will continue to measure strings of data up to the patterns in the order listed, until there is a match. Otherwise, if there is no match, an error message will be displayed.
|
Aspiresoft 2017 © All Rights Reserved. Privacy Policy


